Vermicompost - Composting with Worms
What is Worm Composting?
Worm composting or vermicomposting is a method of composting that uses a large number of composting worms in an enclosed space. Most outdoor compost bins will have worms that come in from the soil and help the process, but that isn't considered true worm composting. In vermicomposting, the whole system revolves around a healthy worm population.
Why Worm Composting?
There are a few reasons people might be interested in worm composting instead of or as a supplement to a traditional outdoor compost bin or using curbside service:
- Worm composting can be done year-round if the bin is kept indoors
- Worm composting can be done indoors without odor or pest problems if done right. How do we know?
The Kane County Recycling Coordinator has ~2,000 worms under her desk!!!
- Worm composting can be done in apartments, condos, and other situations where outdoor composting isn't feasible
- Composters without a garden will need to find a place to take their worm castings
-
Worms are fun for kids and adults alike and are relatively low-effort "pets"
- Getting started is relatively inexpensive, especially if you go the DIY route (see below)
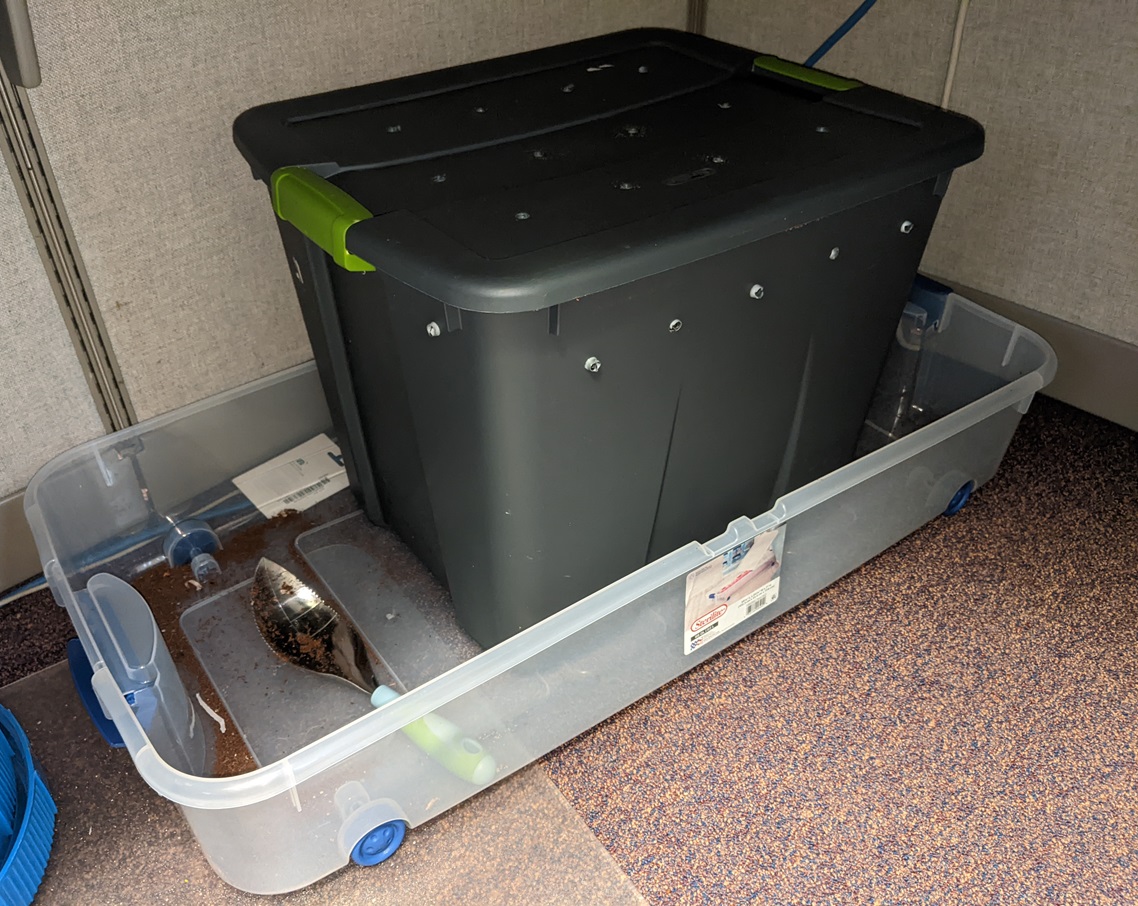 The Kane County Worm Bin, built and established in May 2023 (Photo: C. Ryan)
Getting Started: Buy a System or DIY?
The first step to starting a worm compost project is to decide if you want to buy a system or make one yourself. An advantage to buying a system is that they are usually designed with tiers or trays, which can make harvesting the worm castings easier. They also take less time to set up. A disadvantage is that they probably cost more, especially if you already have DIY materials at home or can get them for cheap or free.
Buying a System
If you buy a system, you want to make sure it's made of sturdy, opaque plastic and that it's a good size for the space you have. Large online retailers like Amazon and Home Depot sell worm composters (Home Depot may or may not stock them in stores seasonally). Some specialty online stores include Gardeners.com and Uncle Jim's Worm Farm. NOTE: The Kane County Recycling Coordinator has not tried any proprietary worm composting systems and thus cannot recommend any particular vendor or set up.
Making a System
If you want to DIY a worm bin,
the materials you will need are:
-
Two plastic storage bins - one must be opaque (not see-through) with a tight fitting lid and at least 12" tall. The second, which will be used to catch drainage, must have a larger footprint than the first but can be see-through and shallow
-
The Kane County Recycling Coordinator used a 20 gallon storage box (22 1/8"L x 18 5/8" W x 16 7/8" H) inside a wheeled under-bed storage box for drainage. NOTE: This is a fairly large system - if you have a small amount of space or not a lot of worm-approved food scrap (see "care and feeding" below), you might want something smaller.
-
A power drill with a large drywall bit (preferred) or, at a pinch, a large nail and a hammer to make air holes
-
Mesh fabric and scissors - can be cut from a mesh jewelry bag or from insect netting to cover air holes
-
A hot glue gun or bottle of strong all-purpose glue
- Use the drill or hammer & nail to make multiple holes (ideally ~1/4" diameter) in the following locations of the opaque bin: on the bottom surface of the bin (these holes are for drainage), on all four sides of the bin about 2" below the top edge, and in the lid of the bin (the side and lid holes are for air-flow). There's no perfect recipe for how many holes are needed, but it's unlikely you can have too many. The Kane County Recycling Coordinator did hers with ~4" spacing, which has worked out fine.
- Cut mesh fabric into small squares. Use glue to stick a square over each hole on bottom of the bin and on the sides. You don't really need mesh on the lid. The mesh prevents worms from escaping.
- Place the lid on the opaque bin and place the lidded bin inside the second, larger bin. You are now ready to add bedding and worms!
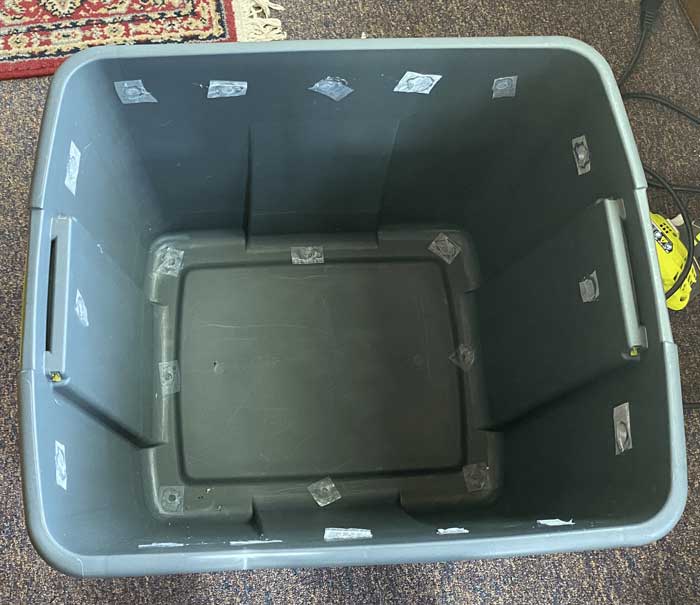 The Kane County Worm Bin under construction - drainage and air holes have been drilled and mesh fabric glued over to prevent escapes (Photo: C. Ryan)
Worm Bedding
The majority of the material in a starter worm-bin should be a carbon-fiber-based bedding material. The Kane County Recycling Coordinator used primarily coconut coir (pronounced "coy-er"), which is coconut fiber sold in dehydrated blocks at garden centers and pet supply stores. The cost is about $5/block. Once fully hydrated the blocks expand to roughly 6x's their starting size. For a small system, you might only need one block. Other materials that can be used as bedding include shredded kraft paper (for example, from paper grocery bags), shredded newspaper (but avoid lots of colored ink), shredded corrugated cardboard, fine sawdust or wood mulch (coarse, chippy sawdust or mulch is not recommended because the sharp edges can hurt worms' skin). Different materials can be mixed together.

A block of coconut coir before rehydration (Photo: C. Ryan)
Regardless of what you use as bedding, it's a good idea to add a few spade-fulls of garden soil and/or sand to the mix. This does two things. The first is it introduces normal soil bacteria to the system. Worms actually get most of their nutrition from the bacteria that are a normal part of decomposition. The second benefit is that putting in soil or sand adds abrasive particles that worms will retain in their gizzards. Worms don't have teeth (thank goodness), so they use a muscular organ called a gizzard, lined with grains of sand or tiny pebbles, to grind up their food.
The last step to prepare bedding for worms is to get it nice and moist. If you can collect some rain water, that's ideal, but tap water works just fine too. Moistened worm bedding should have roughly the same level of wetness as a wrung out sponge at all times. If you take a handful and squeeze it, water should pool between your fingers. If water drips out when you squeeze, it's too wet. Add more dry bedding material to suck up some water. If you take a handful and it's crumbly or not damp, it's too dry. Add some more water.
In the end, you want to make sure your bin (or system tiers) are about half filled up with bedding before adding worms.
WORMS!
Now the fun part! It's time to buy worms. There are three species of worms that are great at composting: red wigglers (Eisenia fetida), Indian blue worms (Perionyx excavatus), and European nightcrawlers (Eisenia hortensis). If you plan to have your worm bin outdoors at all, or in an unheated part of your house, look for red wigglers. If the bin will be only indoors under climate control, any type of the above three should be fine. If you want to nerd out and read more than you could possibly want to know about worms,
Uncle Jim's Worm Farm blog is a great resource. Uncle Jim's and other online vendors sell and ship bags of worms that are billed as being one type, but in reality any worm bag might contain members of all of these species. They are very hard to tell apart. Over time, the species that is best suited to the conditions of your bin will start to dominate the population. The Kane County Recycling Coordinator bought red wigglers but suspects the bin is now dominated by Indian blues, and that's okay!
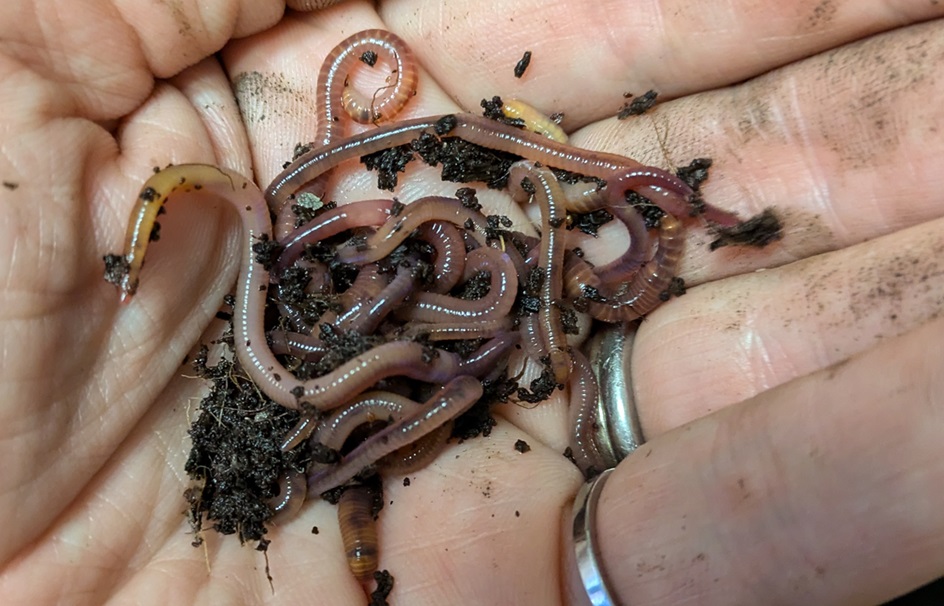
We love our composting worms! (Photo: C. Ryan)
Want to buy local? Did you know that Kane County is home to a commercial worm farm? The
Northern Illinois Worm Farm in Big Rock sells worms for local pick-up or delivery. If that isn't convenient, visit a local bait shop and ask for any of the three species listed above (or a mix).
Worms to avoid are earthworms (Lumbricus spp.), which do best in mineral soils and aren't likely to thrive in a compost bin, and jumping worms (Amynthas spp. & Metaphire spp.). Jumping worms are recently introduced invasive species in North America, and we need to avoid spreading them. It is unlikely that any reputable bait shop or online store will be stocking jumping worms.
How many worms to buy? For most home systems, 1lb. of worms should be plenty. If you do a large system (see "making a system" section above for dimensions of the large Kane County system), 2lbs. can be used. Each pound contains about 1,000 live worms! Ultimately, the worm population will adjust itself through reproduction and die-off to fit the amount of food and space available.
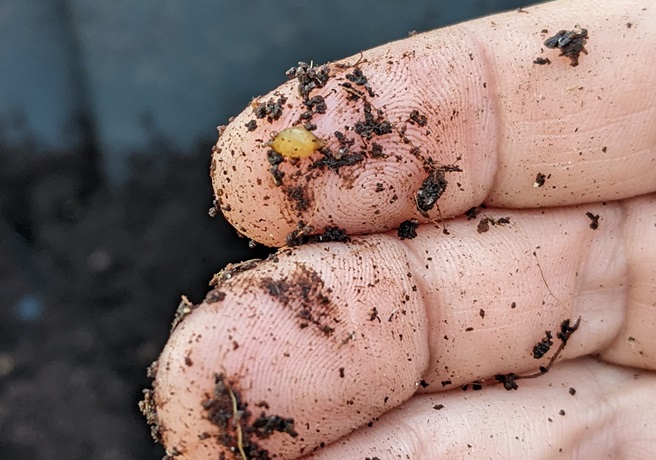
Worm cocoons are a couple of millimeters long, roughly lemon shaped and honey colored. If the bin is in good shape, the worms should breed and make cocoons. (Photo: C. Ryan)
Receiving your worms: If you buy online, you want to make sure your worms arrive on a day someone will be home to bring them inside upon delivery. If this isn't possible, buy them in April or October when daytime temperatures are unlikely to be extremely hot or cold. Worms that have been shipped are usually pretty dehydrated when they arrive. If you can't put them immediately into their new habitat, at the very least open up the package as soon as possible and use a spray bottle to wet them down.
Care and Feeding
When you add your new worms to a new bin with bedding, you don't need to feed them right away. They actually eat the bedding as well, and it's not a bad idea to give the worms a couple of days to acclimate to the bedding before adding food scraps.
What to feed: Worms like plant-based food scraps, with a few exceptions. Avoid the following:
- Oily/greasy foods (oil can clog the pore spaces in the bedding)
- Very salty or briny foods (can dehydrate the worms)
- Citrus (generally not palatable to worms and can turn the system acidic)
- Spicy foods (generally not palatable)
- Meat and dairy
Pretty much everything else is fair game, including coffee grounds, cooked foods, etc.. The Kane County worm squad loves banana peels, melon rinds and leftover cooked beans. Feel free to experiment and see what gets eaten first!
Worm Food - YES!
- 99% of fruit and vegetable scraps
- Avoid citrus and hot peppers
-
Leftovers containing primarily the following:
-
Bread
-
Cooked grains and pasta
-
Fruits and vegetables
- Egg shells
- Coffee grounds and tea bags
- Non-greasy brown napkins and paper towels
Worm Food - NO!
- Dairy products and whole eggs
- Meat and bones
- Oil, grease, and fats
- Spicy foods
- Salty foods / food packed in brine (olives, capers, etc.)
- Greasy napkins or paper towels
- White / bleached paper products
- Citrus (orange peels, lemons, limes, etc.)
We have a sign posted on our fridge door to remind staff what scraps to save for the worm bin.
How to feed: There aren't really hard and fast rules here - just that for every pound of worms you start with, you should plan to feed at least 3lbs. of food scrap per week. You can throw it in there little by little every day, or you can add a larger amount once a week or so (but store your collected scraps in the fridge so they don't get smelly between feedings). The schedule doesn't matter so much, as long as you don't forget about the bin and leave the worms hungry for weeks on end. You can also experiment with chopping or blending the food vs. putting in whole pieces. Worms will work through chopped or blended food faster than large pieces which is good if you have a lot of food scrap. Faster eating also provides less opportunity for bad smells to develop.
One key tip is to bury new food with at least an inch of new bedding. It is important for bedding to be continually refreshed, and burying also prevents bad smells and fruit flies. Any time you aren't feeding or harvesting the bin, it is best to leave the lid on.
Drainage: Over time, most worm stewards get the hang of adding a mix of dry bedding and food scraps to keep the system moist but not wet. However, it is likely that at some point in time, all worm bins will make some liquid drainage. It's especially noticeable if you feed a lot of wet material like melon, cucumber, pears, etc. Purchased systems often come with spigots that can be used to drain liquid. You can drain it into a watering can and apply the drainage (sometimes called "worm tea") to the lawn or garden as a liquid fertilizer. With a bin-in-bin system like the Kane County example, if the inner bin isn't too heavy, you can lift it out and pour off the worm tea from the bottom bin into a bucket or watering can. If the inner bin is too heavy to lift, you can use a turkey baster or irrigation bulb to pull the drainage out.
Harvesting Castings
How to harvest castings will depend on your system design. If you have a tiered system, start by adding fresh bedding and food to the tier above where most of the worms currently are. In theory, the vast majority of worms should migrate over the course of a day or so to the newly fed tier and leave behind the old tier so that you can harvest castings. Simply sift or pick out any remaining worms and large chunks of uneaten food scraps from your castings. Castings should be approximately the color and texture of used coffee grounds (wet castings will be a bit clumpier than coffee). Castings should smell mildly earthy. If you have a closed bin system, like the DIY set up described above, it's important to clean out the finished castings, which accumulate in the bottom of the bin, and do a major refresh of bedding at least twice a year. Three or four times a year is better. Over time, the worms' urea (similar to urine) will accumulate in the bin, gradually getting to a toxic level. You'll need a separate empty, clean plastic container. Use a shovel or small hand tools to scoop out the top few inches of your bin (which should contain the highest density of worms) and put this material in the empty container. This should uncover the finished casting layer. There are likely to still be a lot of worms (and possibly cocoons) in this finished layer. Experts suggest a number of different methods to get these remaining worms out so that you don't lose a large amount of population with each harvest. One tactic is to spread the castings out over a tarp, then use bright light (or sun) to get the worms to burrow down towards the bottom, scooping off the top material and leaving mostly worms behind. Another is to use soil sieves. The Kane County Recycling Coordinator has hand picked worms out of finished castings. It's time consuming, but only has to be done every now and then.
 The worm castings from the Kane County bin are periodically applied to our service garden at Government Center (Photo: C. Ryan)
It is okay to use castings that has some live worms or cocoons in it on your garden. Composting worms are not native to the United States. However, they are unlikely to survive an Illinois winter, so you are not contributing to invasive species problems by putting them in your garden (but see earlier note in "worms" section above about jumping worm species).
Troubleshooting
Problem 1: Worms are dying or escaping in large numbers
Unless your bin lid is very tightly sealed, you should expect some escapees from a new bin, especially if you have Indian blue worms in the mix (which tend to be a bit feistier than red wigglers). If you catch them alive, just put them back in. However, they dehydrate fairly quickly in open air. In an established bin, worms dying or escaping is a sign that something in the habitat is not right, and it can take some detective work to figure out what the issue is. If your bin is outdoors or in a non-climate controlled location, temperature is the first thing to check. Red wigglers need to be kept at a temperature between 55 - 75 degrees Fahrenheit. Indian blues prefer a range of 65 - 85. If your bin is outside of climate control and is getting much hotter or colder than these ranges, there's your problem. Make sure air flow holes aren't blocked or covered up. Make sure the system is draining properly and isn't too wet (see bedding and drainage above). If the bedding is soggy, the air pockets that worms need to breathe get filled up with water. If the bedding is not moist enough, the worms get dehydrated. Are you feeding an appropriate amount for the amount of worms you put in? Keep in mind at least 3 lbs./week per pound of worms. Other common problems are that the system is too acidic or urea levels are too high. The solution in either case is to harvest the castings and put in a lot of fresh bedding. A final potential issue is exposure to an anti-bacterial agent. Never wash your worm care tools or the bin itself with anti-bacterial soap or bleach. If you choose not to wear gloves when working with the bin, don't use hand sanitizer or anti-bacterial hand soap within an hour of touching the worms. You can and should wash your hands after handling (or just wear gloves). If you mess something up and the worms die, simply make good notes of what went wrong and get some new worms.
Problem 2: There are critters other than worms in the system
Usually this isn't a huge problem. Remember back up in the "bedding" section, we recommended mixing in some garden soil? It is expected that there might be some bugs in that soil, and that's okay. There may also be insect eggs on the food scraps that you add. Generally it's not a big deal and the bonus bugs may even contribute to composting. Centipedes and millipedes are one type of critter to watch for, because they are predators and can eat young worms. If you see them, simply try to capture them and take them out. If you get a lot of tiny mites in the bin, that's usually a symptom that the moisture level is too high. Try to add more dry bedding with each addition of food. If there are maggots, it's very likely that someone added meat to the bin. Try to find the source and remove it. In the first 15 months of the Kane County bin, we've had one millipede, a handful of periodic mite issues, and zero maggots or fruit flies.
Problem 3: There are plants growing in the system
Not a big deal. Remember back up in the "bedding" section, we recommended mixing in some garden soil? It is expected that there might be some weed seeds in there, and that's okay. If you add tomatoes or pepper cores to your bin, you might get some of those germinating too. If you're keeping the lid on, which you should, seedlings won't get enough light to grow big. Just ignore them or pull them out.
Problem 4: The system smells bad
Check to make sure you do in fact have a live worm population. If so, and there are bad smells, adjust the amount of food per week downwards, try experimenting with different foods and with chopping or processing the food more finely, make sure all foods are plant-based and not on the avoid list above, and make sure you bury all new food in existing or new bedding. If you have accumulated drainage, remove and use it.
Problem 5: The system is attracting fruit flies
Check to make sure you do in fact have a live worm population. If so, and there are fruit flies make sure the lid to the system is fitting tightly and that you bury all new food in existing or new bedding. In 15 months of maintaining the Kane County bin, we have had no issues with fruit flies because we bury the food and keep the lid closed.
